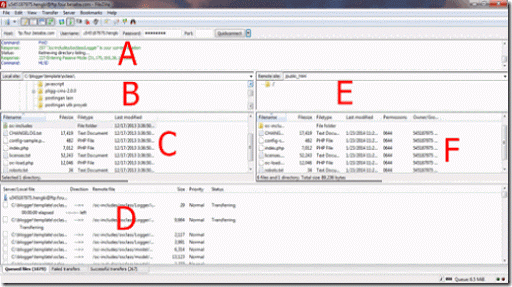
FileZilla or also known as FileZilla Client, is a free, open source, cross-platform FTP software. Binaries are available for Windows, Linux, and Mac OS X. The software supports FTP, SFTP, and FTPS (FTP over SSL/TLS). The following is a tutorial on How to Transfer Files Using Filezilla FTP. this software is the fifth most downloaded software of all time from SourceForge.net
The main features of Filezilla are:
- A site manager, allows users to create a list of FTP sites and their connection data, such as the port number to use, the protocol to use, and whether to use anonymous or normal logs. For normal logs, the username and password will be saved. Password storage is optional.
- Message log, Displays at the top of the window. This feature displays console-type output showing commands sent by FileZilla and responses received from the server.
- File and folder view, Shown below the Message log, providing a graphical interface for FTP. Users can navigate folders and view and modify their contents on local computers and servers using an Explorer-style interface. User can drag and drop files between local computer and server.
- Transfer queue, Displays along the bottom of the window, showing the real-time status of each active queue or file transfer.
How to Transfer Files Using Filezilla FTP
1. Download the Filezilla FTP Client first at the link https://filezilla-project.org/download.php and install
2. After the installation is complete, click Filezilla to activate the application
3. Fill in the "Host" column with ftp.namadomain.com or your server ip address
4. Fill in the fields for your username and password for your ftp domain hosting
5 Fill Port with 21 or just leave it empty, don't need to fill it
6. Click “Quickconnect” and if your settings are correct it will be directly connected

7. After successfully connected, select the file to be transferred from your computer directory which is displayed in column B.
8. Select the server directory to store your files on the hosting server, usually in the public_html folder
9. Look at column C, select the file to be transferred by clicking 2x, if it is in the form of a folder then click then drag column E or it can also be done by right-clicking the mouse and selecting upload. One way to upload quickly is to click on the file folder, so the upload process will automatically work itself.
10. Wait for the file upload process to complete. Filezilla will automatically reconnect if at the time of file transfer there is a lost signal.
The speed of uploading files to directories is very dependent on the number of files and latency from your network to the server. there may also be errors that may occur.
Thus the article How to Transfer Files Using Filezilla FTP we made, hopefully it can be useful for you
